Information to provide accessibility vendors before your event.
- Link to Zoom or venue location
- Times for set-up, start, and finish (estimated arrival 30 min before the event starts).
- List of names, medical terms, or industry-specific jargon that may be used.
- Slide deck, script, or other materials.
- Do not extend your event beyond scheduled time for ASL/CART staff without consulting them first, as they may not be able to stay late, and access must be provided for the entire event/session requested.
Setting up captioning in Zoom
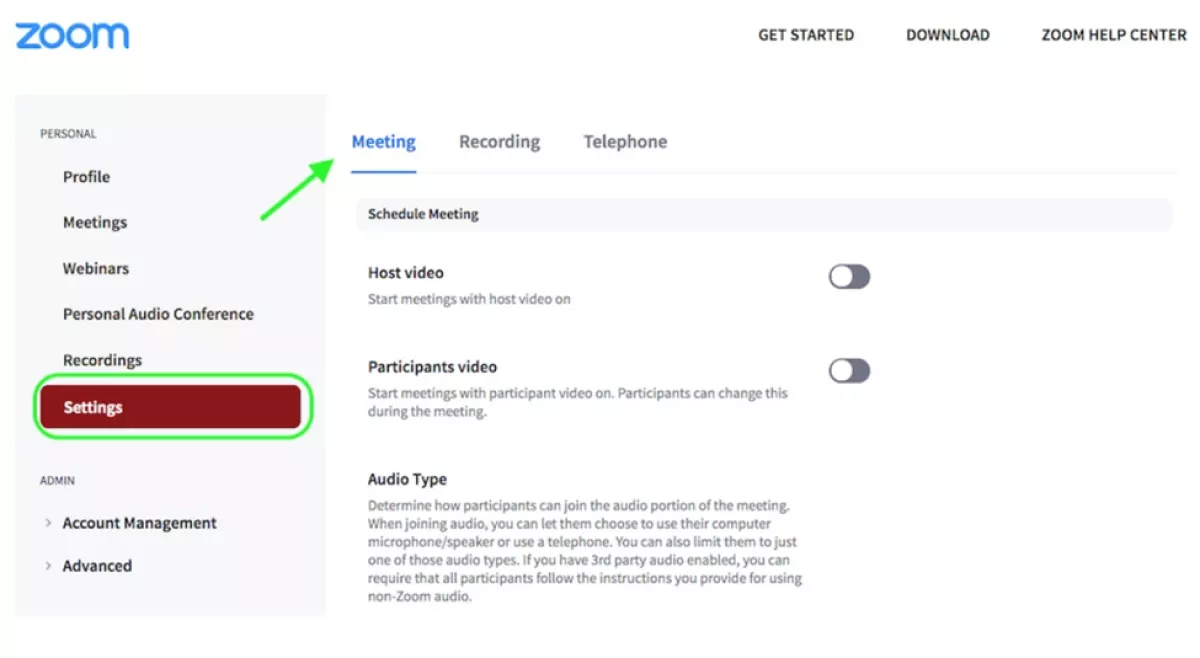
- Go to your Zoom Settings - this only needs to be done once.
Click on Settings (see green circle in diagram) in the lefthand menu bar and ensure that "Meetings" (green arrow) is in blue and underlined.
- Scroll past In Meeting (Advanced), indicated with the green arrow below, until you find Closed captioning and Save Captions.
- Both settings are ON by default; if you previously turned either setting off, toggle to the right - or click "reset" - to turn each option back ON.
You can now assign a captioner to provide closed captions in future Zoom sessions.

Assign a Captioner in Zoom - do this at the start of each session.
- After starting your Zoom session, click on the Closed Caption (CC) icon (circled in red) located along the bottom menu bar.
- Click on the "Assign a participant to type" button indicated by the red circle, and a window will open to the right with a list of your session participants.
- Two buttons will appear as you hover over each name: "Mute" and "More". Find the participant with "Captioner" in their name.
Click on "More" to open the participant menu and click "Assign a participant to type" (see red circle).

Note:
- Zoom has a feature where you can enable automatic captioning in your Accessibility Settings.
- Go to User Preferences and click Go to Accessibility.
- Check box under Accessibility for Always show captions.
You can customize the size and font on your captions by changing the Closed Captioning Font Size.

Setting-up Sign Language Interpreters in Zoom
Zoom does not offer sign language interpreters; hosts must provide and assign users as sign language interpreters in the virtual event or meeting.
To enable Sign language interpretation view:
- Sign into the Zoom web portal.
- In the navigation menu, click Settings.
- Click the Meeting tab.
- Under In Meeting (Advanced), click the Sign language interpretation view to enable or disable it.
How to manage sign language interpretation during a virtual event
- Sign into the Zoom web portal.
- Start an event or meeting as the host.
In the meeting controls toolbar, click the Interpretation

icon.
Note: On smaller screen sizes or windows, you may have to click the More
icon, then click Interpretation. A window will open for managing interpretation, where you can do any of the following:
- View everyone assigned to an interpreter role.
- Add or remove someone from an interpreter role.
- Start or end the interpretation feature for everyone.
To add an interpreter:
- Add an interpreter: Click + Add Interpreter, choose if you want to add a sign language interpreter, then select their name and language.
- At the bottom of the interpretation management window, click Start or End.
- Start: Everyone is notified that sign language interpretation is available. Anyone designated as a sign language interpreter will be shown in a designated video channel for the language they're interpreting.
- End: Everyone is notified that the host has ended interpretation. For anyone designated as a sign language interpreter, their microphone is enabled but muted by default, and their video reappears in the meeting or webinar.
Allow a sign language interpreter to talk
By default, sign language interpreters will not be allowed to unmute their microphones in Zoom, unless given permission from the host. Sign language interpreters may use their voice (using audible speech) to interpret from American sign language to English.
To give a sign language interpreter permission to speak in the session by unmuting their microphone:
In the meeting controls toolbar, click the Participants

icon.
Hover over the name of the interpreter, then click Allow to talk.

Recording sign language interpreters in Zoom
Recording to your computer is necessary to record sign language interpreters.
- Cloud recordings do not include interpreter video.
- You must record the meeting on your computer.
- Even when recording to the computer, the interpreter window will not be recorded by default.
- Select Allow to Speak for each interpreter. This is the only way they will be captured in the final video. This does mean that the interpreter's video will be visible to everyone.
- The entire gallery of all participants will need to be captured to also record interpreters.
- Pin or Spotlight interpreters so that they appear prominently.
- Select View (in the upper right corner) and select Gallery and Hide Non-video Participants.
Accessibility Considerations for Break-out Rooms
Tips for breakout rooms
- Pay attention to accommodations. If CART captioners or ASL interpreters are present, assign them to the same breakout room as the participant receiving the live captioning or ASL interpreting.
- Maintain anonymity when assigning participants to breakout rooms with accommodations.
- Note: Zoom only allows for one break-out room to have CART captioning and/or ASL interpretation. Announce which break-out room will have captioning or ASL.
- A host must assign all requesters and their accessibility service providers to the same break-out room.
- Auto captions are available in multiple breakout rooms.
- Provide flexibility in participation. Some people with disabilities may prefer not to join a breakout room. Whenever possible, it is best to allow participants the option to remain in the main Zoom session if they would prefer not to join a breakout room.
Final Accessibility Check: Day of Event Considerations
Final checklist items:
- Do a final accessibility check of the event venue and/or remote platform.
- Ensure approved accommodations are in place and scheduled.
- Ensure presentation materials are accessible.